Player Controls - Devlog 1

Player Movement - Devlog 1
Heyo everyone!
First devlog of the progress I have done so far which is player movement.
So first off lets talk about the player.
The player is a plane that will be able to flip and fly around as the movement of the plane. The plane also has a somewhat realistic aspect to how it flies. The gif animation below show's the finished example of how the player moves throughout the game world.

Testing/Feedback
The flight of the plane is quite easily controllable. Even though this is the only first part of the controls, It will also support gamepads (which I cannot test but only implement) to provide the best controller experience for everyone.
Visually the game is quite empty (Except for the plane) and 2 squares. However, Being that I can generate sprites from 3D assets this won't be too hard to create and add to the game.
"It would have been nice if WASD keys were available. Other than that, the controls felt good. Perhaps an ability to change the direction of the plane when taxiing?": I didn't originally plan to make it so the planes could change directions when taxiing since you will mostly be in the air to attack. The only time you will be on the ground is when landing at your base to restock, however this is something that I am considering on adding. For WASD keys, Yes these will be available once I add re-assignable controls however, it is something that I will probably add later towards the end of the game development.
Creation Process
Animation Files Setup:
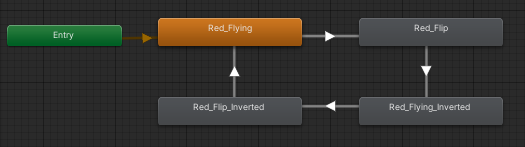
First off. After creating the project, I created/generated the sprites from blender using the small red plane from [Synty Studios, Simple Airport]. After creating the sprites, I imported each individual frame of the sprite into unity and then created the flying and flipping animation files by selecting 4 sprite frames and dragging and dropping into the scene. Next, I created the plane animation controller and imported 4 animation states (3 files, 1 inverted flip animation). Then I created a boolean condition called Invert and applied that condition to the transitions of each state.
Plane Prefab Setup:
Next I created an empty gameobject and called it Red_Plane, then I added the Sprite Renderer, RigidBody2D, BoxCollider2D, Animator and PlayerInput components onto the plane gameobject. After that, I created 3 child gameobjects onto the plane. The first being an empty gameobject called CenterOfMass which will be used to set a variable in the RigidBody2D component in the Plane script that I will setup later. The second being a trail renderer to have a trail behind the plane as it is moving, and the final gameobject being another empty gameobject called WheelCollider with a CapsuleCollider2D that is used to let the plane land. Next, I created a new Physics2DMaterial called WheelMaterial and attached it onto the CapsuleCollider2D.
Script Setup:
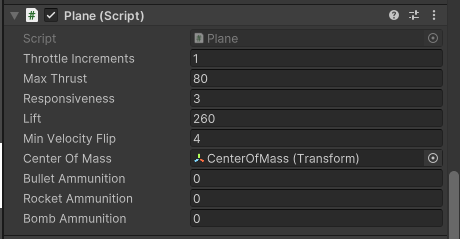
First off, I created 2 scripts that will contain everything to control the plane and the behavior's of the plane. The first is the Plane script that contains everything from Bullet Amount to the types of bullets, lift force, IsFlipped, CenterOfMass setting, etc... The second script is the PlayerController which handles inputs from the PlayerInput component and requests them onto the Plane script. The reason why I did it this way is so when the Enemy AI script is created, it will interact with the same API from the Plane script without needing to change anything else. Essentially making it so the EnemyAI and PlayerController are both controller behavior's while the Plane script handles those behavior's and translates it into an action. Next in the Plane script I setup the public variables as show below...
After that, I get the components and cached them into private variables which will be used later on for flipping the plane.
Next, I applied the forces onto the RigidBody2D component in the FixedUpdate() function and got quite some interesting results Shown below. Yes, this was not as simple and straightforward as I first thought it would be. I had to consider local x velocity and global y velocity times by lift, times by transform.direction.right, and other things that will just be too much to explain. Either way, I was really happy when I finally got it working.

Cinemachine Setup:
Cinemachine was probably one of the easiest but also hardest things to setup. First off I created a 2D virtual camera that was linked to the MainCamera. Second, I created a TargetGroupCamera and set the groups I wanted to include with a radius of 3 e.g. the box and the plane. Then after that you would think I would be done but NO. Something was wrong... The camera was rotating. So after a bit of messing with settings and researching online for answers, I could not figure it out. So with some good help from Lindsay who in fact was just as puzzled as I was for the first few minutes, There were 2 settings that only needed to be changed. The first being the body had to be set to Framing Transposer and the second was to set the aim to Do Nothing.
References:
Synty Studios - Simple Airport: https://assetstore.unity.com/packages/3d/environments/industrial/simple-airport-...
Leave a comment
Log in with itch.io to leave a comment.